How to upload your website files using the File Manager.

Step 1 – Log in to cPanel

You will find your hosting details sent to your registered email under the subject "New Account Information."


Step 2 – Locate the File Manager

Click on it to open.


Step 3 – Navigate to public_html

This will take you inside the directory.

Note: Prepare your files by compressing them into a single ZIP file. Uploading one ZIP file makes the process smoother.


Step 4 – Upload the ZIP File

After compressing your files into a ZIP file, click on Upload.


Step 5 – Select and Upload the ZIP File

Click Select File to upload your ZIP file. Wait for the upload to complete.


Step 6 – Extract the ZIP File

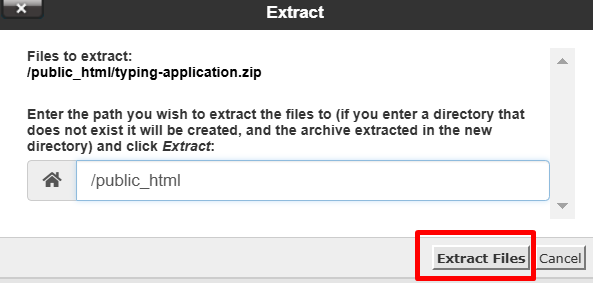
Once the ZIP file is uploaded, right-click on it and select Extract.
Ensure the extraction path is set to /public_html in the pop-up window. Then, click the Extract button.


✦ Now that you’ve successfully uploaded and extracted your website files into the public_html directory, your website should be accessible online :)

  • File Manager كيف يتم رفع الملفات عن طريق
  • 1 Users Found This Useful
Was this answer helpful?

Related Articles

Use Web Disk on cPanel to upload files

      1- Log in to the Hawsabah website     2- From the top of the list, click on Services...

Add a new domain in cPanel

1- Log in to the Hawsabah website     2- From the top of the list, click on Services then My...

Hosting upgrade

      1- Log in to the Hawsabah website     2- From the top of the list, click on Services...

Change the Root password for VPS OR DEDICATED SERVER

        1- Log in to the Hawsabah website     2- From the top of the list, click on...

Change your cPanel password

      1- Log in to the Hawsabah website     2- From the top of the list, click on Services...